

You’re no stranger to locally hosted php. Especially using MAMP or XMPP. Here is how you get started locally with NodeJS.
Getting started setting up your first node.js app up locally on OS X is so easy it makes my eyes tingle. I have always developed on a Mac, so if you are interested in windows, it’s probably best to find someone who specializes in that. If this doesn’t concern you, read on!
First you’ll need to install node on your OS X installation. The easiest way to do that is with homebrew. If you aren’t familiar with homebrew, it is a package manager that takes care of the installation of software in the *nix underbelly of OS X.
Install homebrew by going here http://brew.sh/. And following the installation instructions.
Once that is done. You will be able to install node.js on your Mac with three beautiful words. Open your terminal and type:
brew install node This will install node.js on your mac, where node can be activated at any time by popping open a terminal and typing “node”. This installation will include “npm” the node package manager. Which gives you access to all of the node modules that exist on npmjs.org. Similar to composer, but easier to set up.
Next. Open up your terminal and type:
npm install -g express
This command will install express in a location on your mac where you can access it from any directory. If you leave out the “-g” it will install express in a directory named node_modules in the directory you were in when you ran the command.
Keeping the -g will make it so you can boilerplate a new express app in any directory you wish.
Pop open your terminal create a directory for your new app using:
mkdir ~/myfirstnodeapp
cd myfirstnodeapp
Then you will use express to set up the boilerplate for your app. You can see the options by typing the command:
express --help
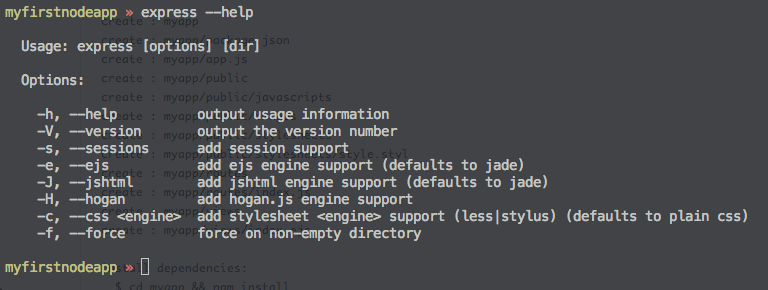
For the purposes of showing you what I used, we are going to create our app with a couple of the options. We will be using ejs for the templating engine, and we want to enable sessions. There are lots of different templating engines that use different styles of injecting dynamic content into your templates. EJS markup is remarkably similar to the php templating <!--?. You use <% instead. In my experience so far the rest of the patterns are the same, except you write javascript in between your tags instead of php.–>
So lets boilerplate our app.
express -e -s
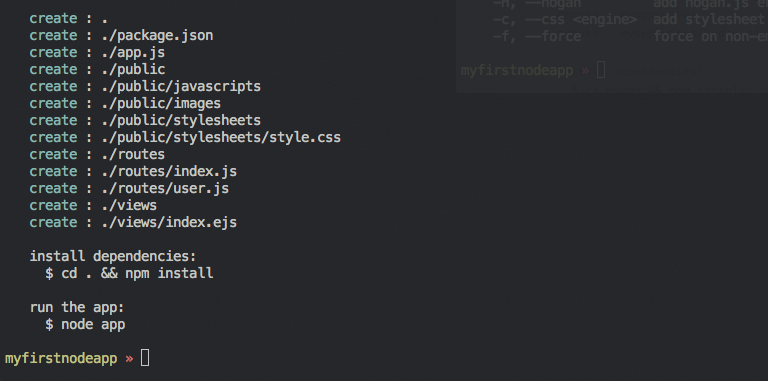
You’ll see feedback in your terminal that will echo the files that are created in your app directory. Included will be the instructions for installing the app from the boilerplate that was created using npm.
Do that by typing:
npm installThis will read the contents of the package.json file that was generated in your app directory, and it will download and install the dependencies into a node_modules directory.
Now you’re ready to start up your server and see whats going on. It’s easy as this.
node appThen open a browser and navigate to http://localhost:3000
And you’ll see your first node app running on your local server.
Your App’s Anatomy
Looking in your node app directory, you’ll see four directories.
node_modules: holds all of your locally installed libraries for your app. As you build, adding a dependency is as easy as typing.
npm install *what you want* --save
And requiring that new dependency in your code to use it.
PROTIP: If you remember the `–save` your added dependency will automatically be added to your package.json file.
public: Holds all of the static assets that you need to have available to the browser. In there you’ll find directories for images, front end javascripts, and stylesheets.
routes: Holds your controllers all of your logic to be executed when your app hits a particular route. Ex. http://localhost:3000/ maps to the index.js, which provides the logic, and then renders the markup for views/index.ejs
views: Holds your view templates, in this case they are *.ejs files
app.js: Is the main application file, that knits together these directories, and starts up your web server. Node and express replaces the functionality of Apache and PHP.
package.json: Is the file that sets up the list of dependencies, the app name and version etc. So when you go to deploy this somewhere else. running npm install will setup everything you need.
TIME TO BUILD!
One of the things to remember is that when your app is started up, all of the JavaScript files are read into memory. So as you develop, the server would need to be restarted to see your changes. Having to do this is tedious, and nodemon fixes this. Nodemon is a node utility that will watch your files for changes, and restart the server for you, so that you can simply save your work, and refresh your browser to see your changes.
To install nodemon:
npm install -g nodemon
To use nodemon go to your app directory and type:
nodemon app.jsIf you happen to have an error in your code however, it will fail to restart, you’ll see the error in your terminal where you launched the app. I do a lot of console.log in the browser to debug client side JavaScript. This command works in server-side JavaScript as well, and the console messages will echo out in the terminal.
Just like that, you should have node installed, an express app setup and running locally, and the basic file structure and debugging info to be able to start tinkering with your own node.js application. Now it’s time for me to gather my thoughts on the next step of authentication and data storage with mongoose and mongodb, or, you know, sleep. Probably both.